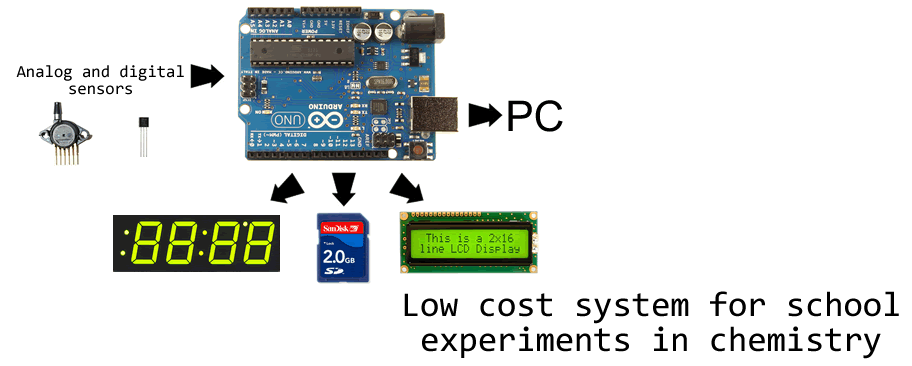
pH meter with PC datalogger
This project is based on Sparky's Widget Mini I2C pH interface, most parts of the code are from SparkysWidget GitHub page. This interface is cheap, easy to work with and usable from pH 0.1 to 14.
We tested this and this cheap pH probes with no significant difference and find them suitable for classroom use.
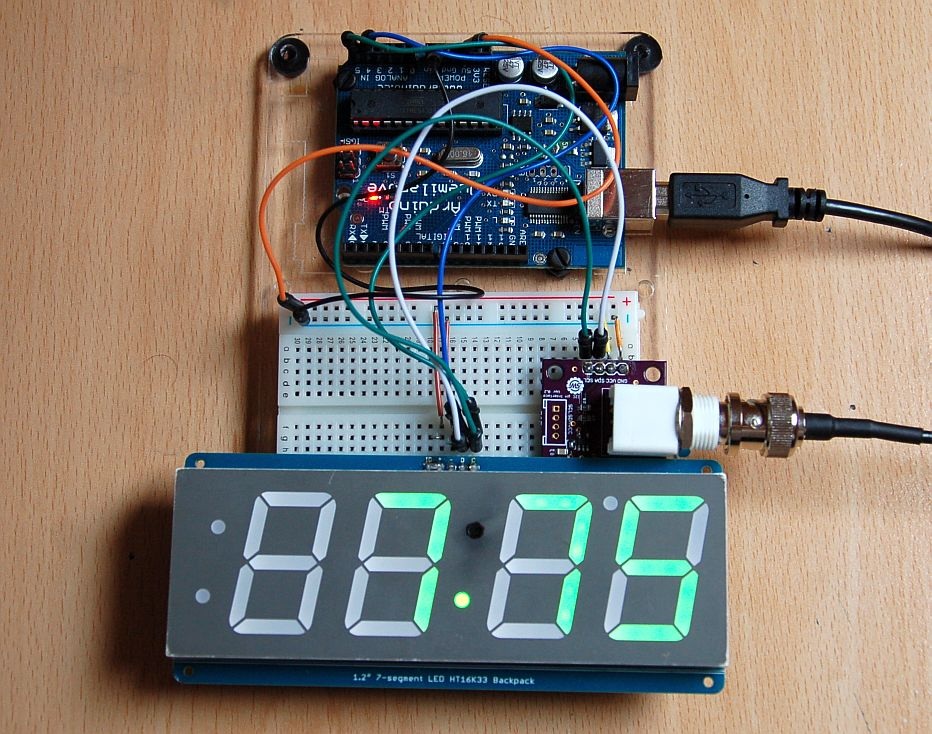
The connection is very simple. the pH interface has four pins: GND, VCC, SDA and SCL. These are connected to GND, +5, Analog-4 and Analog-5 ports of Arduino.
As a output device we use this 1.2" LED display from Adafruit which is easily legible from any point of usual classroom. Instruction for preparing the display are available at Adafruit webpage. For usage with Arduino Duemilanove we recommend to solder together the (+) and IO pins of display. In this case only four leads are necessary to connect the display to Arduino. Connection of display is simple too: pins (+) and (-) are connected to +5V and GND respectively, D is connected to Analog-4 and C to Analog-5 (on more recent Arduino cards like R3 and later the pin D is connected to specialized SDA port and C to SCL). For more information please see the Adafruit webpage for this display. Don't be bothered by the fact that both the display and pH interface are connected to the same ports of Arduino card - both devices uses I2C interface, buth have different adresses.
As we are not skilled electronic engineers, we like to build the device on breadboard first and we highly recommend it, unless you have some background in electronics. After double-checking your connections you can upload this source code to the Arduino card. Source code uses Adafruit libraries, which are part of the Arduino IDe that you can download from this page.
The USB port of the Arduino card can be used to process pH data on the PC. We are currently working on siutable software.
1: /*
2: This is a simple example showing how to interface our mini I2C pH interface.
3: The usage for this design is very simple, as it uses the MCP3221 I2C ADC. Although actual
4: pH calculation is done offboard the analog section is very well laid out giving great results
5: at varying input voltages (see vRef for adjusting this from say 5v to 3.3v).
6: MinipH can operate from 2.7 to 5.5V to accomdate varying levels of system. Power VCC with 3.3v for a raspi!
7: ADC samples at ~28.8KSPS @12bit (4096 steps) and has 8 I2C address of from A0 to A7 (Default A5)
8: simply assemble the 2 BYTE regiters from the standard I2C read for the raw reading.
9: conversion to pH shown in code.
10: Note: MinipH has an optional Vref(4.096V) that can be bypassed as well!
11:
12: Sparky's Widgets 2012
13: http://www.sparkyswidgets.com/Projects/MiniPh.aspx
14:
15: */
16:
17:
18: #include "Adafruit_MAX31855.h"
19: #include "Adafruit_LEDBackpack.h"
20: #include "Adafruit_GFX.h"
21: #include <Wire.h>
22: Adafruit_7segment matrix = Adafruit_7segment();
23:
24: #include <Wire.h>
25: #include <avr/eeprom.h> //We'll want to save calibration and configration information in EEPROM
26: #define Write_Check 0x1234 //EEPROM trigger check
27: #define ADDRESS 0x48
28:
29: //Our parameter, for ease of use and eeprom access lets use a struct
30: struct parameters_T
31: {
32: unsigned int WriteCheck;
33: int pH7Cal, pH4Cal;
34: float pHStep;
35: }
36: params;
37:
38: float pH;
39: const float vRef = 4.096; //Our vRef into the ADC wont be exact
40: //Since you can run VCC lower than Vref its
41: //best to measure and adjust here
42: const float opampGain = 5.25; //what is our Op-Amps gain (stage 1)
43:
44: void setup(){
45: Wire.begin(); //conects I2C
46: Serial.begin(9600);
47: //Lets read our Info from the eeprom and setup our params,
48: //if we loose power or reset we'll still remember our settings!
49: eeprom_read_block(¶ms, (void *)0, sizeof(params));
50: Serial.println(params.pHStep);
51: //if its a first time setup or our magic number in eeprom is wrong reset to default
52: if (params.WriteCheck != Write_Check){
53: reset_Params();
54: }
55:
56: matrix.begin(0x70);
57: matrix.setBrightness(15);
58: matrix.writeDisplay();
59:
60: delay(1000);
61: }
62:
63:
64: void loop(){
65: //This is our I2C ADC interface section
66: //We'll assign 2 BYTES variables to capture the LSB and MSB(or Hi Low in this case)
67: byte adc_high;
68: byte adc_low;
69: //We'll assemble the 2 in this variable
70: int adc_result;
71:
72: Wire.requestFrom(ADDRESS, 2); //requests 2 bytes
73: while(Wire.available() < 2); //while two bytes to receive
74: //Set em
75: adc_high = Wire.read();
76: adc_low = Wire.read();
77: //now assemble them, remembering our byte maths a Union works well here as well
78: adc_result = (adc_high * 256) + adc_low;
79: //We have a our Raw pH reading fresh from the ADC now lets figure out what the pH is
80: calcpH(adc_result);
81:
82: //Lets handle any commands here otherwise if we do prior to a fesh ADC reading
83: //may end up calibrate to slightly older data (this really might not matter, handle as you will)
84: if(Serial.available() )
85: {
86: char c = Serial.read();
87: if(c == 'C')
88: {
89: //Which range?
90: int calrange;
91: calrange = Serial.parseInt();
92: if( calrange == 4 ) calibratepH4(adc_result);
93: if( calrange == 7 ) calibratepH7(adc_result);
94: }
95: if(c == 'I')
96: {
97: //Lets read in our parameters and spit out the info!
98: eeprom_read_block(¶ms, (void *)0, sizeof(params));
99: Serial.print("pH 7 cal: ");
100: Serial.print(params.pH7Cal);
101: Serial.print(" | ");
102: Serial.print("pH 4 cal: ");
103: Serial.print(params.pH4Cal);
104: Serial.print(" | ");
105: Serial.print("pH probe slope: ");
106: Serial.println(params.pHStep);
107: }
108: }
109: //Spit out some debugging/Info to show what our pH and raws are
110: Serial.print("pH: ");
111: Serial.print(pH);
112: Serial.print(" | ");
113: Serial.println(adc_result);
114:
115: String t = String(pH);
116: int PointIndex = t.indexOf('.');
117: String pHinteger = t.substring(0, PointIndex);
118: String pHdecimals = t.substring(PointIndex+1);
119: Serial.println(pHdecimals);
120: if (pHinteger.length() == 2) { // If pH is between 10.00 and 14.00
121: String t1 = pHinteger.substring(0, 1); // ...we need the first
122: String t2 = pHinteger.substring(1, 2); // and second digit from the "pHinteger"
123: String t3 = pHdecimals.substring(0, 1); // and first
124: String t4 = pHdecimals.substring(1, 2); // and second digit from the "pHdecimals"
125: // which we plot to the second, third and fourth place of 7-seg
126: matrix.writeDigitNum(0, t1.toInt());
127: matrix.writeDigitNum(1, t2.toInt());
128: matrix.writeDigitNum(3, t3.toInt());
129: matrix.writeDigitNum(4, t4.toInt());
130: } ;
131:
132: if (pHinteger.length() == 1) { // If pH is between 1.00 and 9.99
133: String t1 = pHinteger.substring(0, 1); // ...we need the first digit from the "pHinteger"
134:
135: String t3 = pHdecimals.substring(0, 1); // and first
136: String t4 = pHdecimals.substring(1, 2); // and second digit from the "pHdecimals"
137: // which we plot to the second, third and fourth place of 7-seg
138: matrix.writeDigitRaw(0,0);
139: matrix.writeDigitNum(1, t1.toInt());
140: matrix.writeDigitNum(3, t3.toInt());
141: matrix.writeDigitNum(4, t4.toInt());
142: } ;
143:
144: matrix.writeDigitRaw(2, 0x02);
145: matrix.writeDisplay();
146:
147: //You can delay or milis here depending on what tasks(others) you may have
148: delay(1000);
149:
150: }
151:
152:
153: //Lets read our raw reading while in pH7 calibration fluid and store it
154: //We will store in raw int formats as this math works the same on pH step calcs
155: void calibratepH7(int calnum)
156: {
157: params.pH7Cal = calnum;
158: calcpHSlope();
159: //write these settings back to eeprom
160: eeprom_write_block(¶ms, (void *)0, sizeof(params));
161: }
162:
163: //Lets read our raw reading while in pH4 calibration fluid and store it
164: //We will store in raw int formats as this math works the same on pH step calcs
165: //Temperature compensation can be added by providing the temp offset per degree
166: //IIRC .009 per degree off 25c (temperature-25*.009 added pH@4calc)
167: void calibratepH4(int calnum)
168: {
169: params.pH4Cal = calnum;
170: calcpHSlope();
171: //write these settings back to eeprom
172: eeprom_write_block(¶ms, (void *)0, sizeof(params));
173: }
174:
175: //This is really the heart of the calibration proccess, we want to capture the
176: //probes "age" and compare it to the Ideal Probe, the easiest way to capture two readings,
177: //at known point(4 and 7 for example) and calculate the slope.
178: //If your slope is drifting too much from Ideal(59.16) its time to clean or replace!
179: void calcpHSlope ()
180: {
181: //RefVoltage * our deltaRawpH / 12bit steps *mV in V / OP-Amp gain /pH step difference 7-4
182: params.pHStep = ((((vRef*(float)(params.pH7Cal - params.pH4Cal))/4096)*1000)/opampGain)/3;
183: }
184:
185: //Now that we know our probe "age" we can calucalate the proper pH Its really a matter of applying the math
186: //We will find our milivolts based on ADV vref and reading, then we use the 7 calibration
187: //to find out how many steps that is away from 7, then apply our calibrated slope to calcualte real pH
188: void calcpH(int raw)
189: {
190: float miliVolts = (((float)raw/4096)*vRef)*1000;
191: float temp = ((((vRef*(float)params.pH7Cal)/4096)*1000)- miliVolts)/opampGain;
192: pH = 7-(temp/params.pHStep);
193: }
194:
195: //This just simply applys defaults to the params incase the need to be reset or
196: //they have never been set before (!magicnum)
197: void reset_Params(void)
198: {
199: //Restore to default set of parameters!
200: params.WriteCheck = Write_Check;
201: params.pH7Cal = 2048; //assume ideal probe and amp conditions 1/2 of 4096
202: params.pH4Cal = 1286; //using ideal probe slope we end up this many 12bit units away on the 4 scale
203: params.pHStep = 59.16;//ideal probe slope
204: eeprom_write_block(¶ms, (void *)0, sizeof(params)); //write these settings back to eeprom
205: }
Calibration is done with pH 4 and pH 7 buffers solutions by sending letter C in Serial Monitor (please see How to? if you have any trouble) and then C4 and C7 with probe in pH 4 and pH 7 buffer solution respectively. Sending letter I displays saved information.
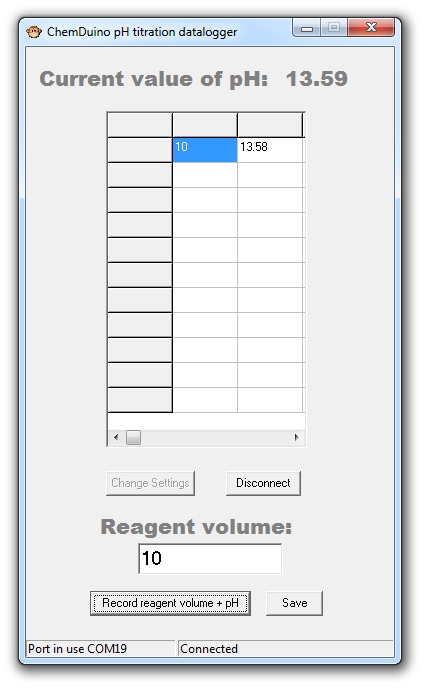
For the titration experiments we designed simple PC datalogger. User writes reagent volume and by clicking button tis volume and current value of pH is written to table which can be later saved. Appilaction with source codes is avaliable here. We know that Delphi 7 is outdated programming envirment and currently we are rewriting this datalogger in C#.