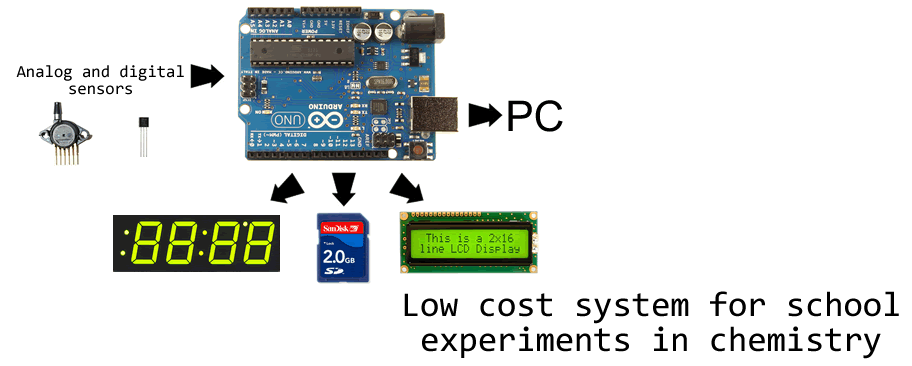
-200 to 1400°C thermometer
This is on of the more advanced projects, but if we managed to make it run, anybody will do :-) The hearth of the system is Adafruit thermocouple amplifier for K-type thermocouple. According to you needs, you can pick up any K-type thermocouple.
We used the Vernier Type-K Thermocouple Wire (code KWIRE-TCA), because for $15 it can measure temperature from -200 to 1400°C. For this thermocouple you will need appropriate mounting socket. If you need smaller temperature range, you can save respectable amount of money.
The connection of thermocouple amplifier to Arduino board is as follows: Vin is connected to +5V, 3Vo is not connected, GND to GND. DO pin on the thermocouple amplifier is connected to Digital pin 3 on Ardino, CS on Digital pin 4 and CLK to Digital pin 5.
Whole thing is then secured with hot melt adhesive. As a output device we use this 1.2" LED display from Adafruit which is easily legible from any point of usual classroom. Instruction for preparing the display are available at Adafruit webpage. For usage with Arduino Duemilanove we recommend to solder together the (+) and IO pins of display. In this case only four leads are necessary to connect the display to Arduino.
As we are not skilled electronic engineers, we like to build the device on breadboard first and we highly recommend it, unless you have some background in electronics.
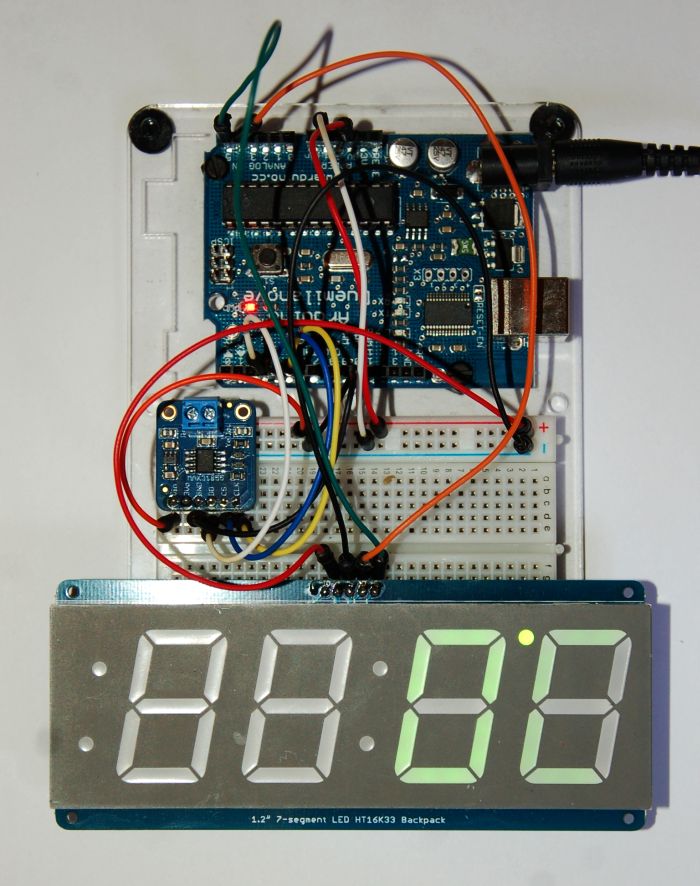
Connection of display is simple: pins (+) and (-) are connected to +5V and GND respectively, D is connected to Analog-4 and C to Analog-5 (on more recent Arduino cards like R3 and later the pin D is connected to specialized SDA port and C to SCL). For more information please see the Adafruit webpage for this display.
After double-checking your connections you can upload this source code to the Arduino card. Source code uses Adafruit libraries, which are part of the Arduino IDe that you can download from this page.
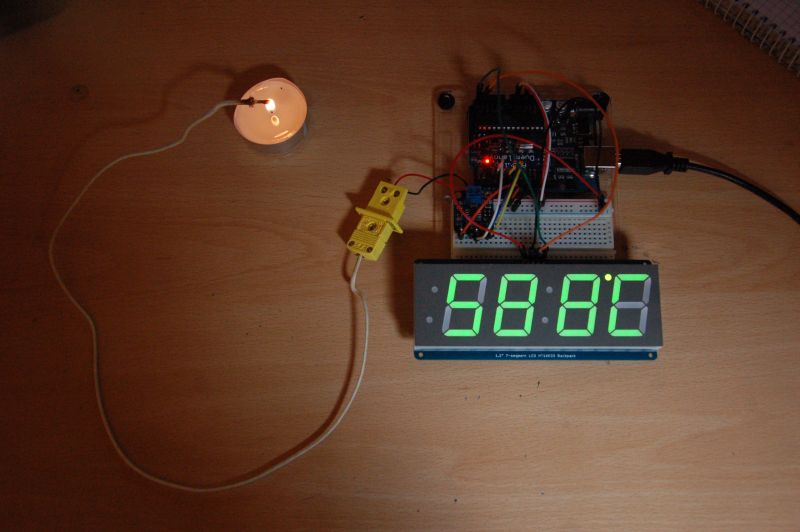
Then you can connect the thermocouple to amplifier via thermocouple socket and start measuring whatever you want!
For this thermometer we designed 3D-printed encolsure. With magentic backside it can be easily monted on the whiteboard.
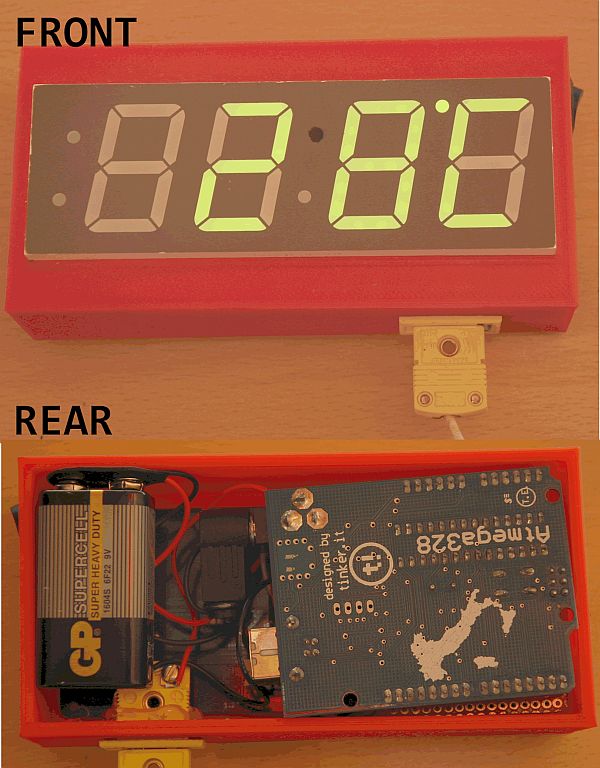
The 3D data will be available soon.
1:  /***************************************************
2:  This is an example for the Adafruit Thermocouple Sensor w/MAX31855K
3:
4:  Designed specifically to work with the Adafruit Thermocouple Sensor
5:  ----> https://www.adafruit.com/products/269
6:
7:  These displays use SPI to communicate, 3 pins are required to
8:  interface
9:  Adafruit invests time and resources providing this open source code,
10:  please support Adafruit and open-source hardware by purchasing
11:  products from Adafruit!
12:
13:  Written by Limor Fried/Ladyada for Adafruit Industries.
14:  BSD license, all text above must be included in any redistribution
15:  ****************************************************/
16:
17:  #include "Adafruit_MAX31855.h"
18:  #include "Adafruit_LEDBackpack.h"
19:  #include "Adafruit_GFX.h"
20:  #include <Wire.h>
21:  Adafruit_7segment matrix = Adafruit_7segment();
22:
23:  int thermoDO = 4;
24:  int thermoCS = 6;
25:  int thermoCLK = 7;
26:
27:  Adafruit_MAX31855 thermocouple(thermoCLK, thermoCS, thermoDO);
28:
29:  void setup() {
30:    Serial.begin(9600);
31:    // Start up the library for 7-seg and set max brightness
32:    matrix.begin(0x70);
33:    matrix.setBrightness(15);
34:    matrix.writeDisplay();
35:
36:    // wait for MAX chip to stabilize
37:    delay(1000);
38:
39:  }
40:
41:  void loop() {
42:
43:    int c = thermocouple.readCelsius();
44:    if (isnan(c)) {
45:      Serial.println("Something wrong with thermocouple!");
46:      } else {
47:      String t = String(abs(c));
48:      Serial.println(t);
49:
50:      if ((t.length() == 4) && (c>0)) {      // If the temerature is between 999 and 9999
51:       String t1 = t.substring(0, 1);        // ...we need the first
52:        String t2 = t.substring(1, 2);       // and second
53:        String t3 = t.substring(2, 3);       // and third digit
54:        String t4 = t.substring(3, 4);       // and fourth digit
55:        matrix.writeDigitNum(0, t1.toInt()); // which we plot to the first, second,
56:        matrix.writeDigitNum(1, t2.toInt()); // third and fourth place of 7-seg
57:        matrix.writeDigitNum(3, t3.toInt());
58:        matrix.writeDigitNum(4, t4.toInt());
59:      } ;
60:
61:      if ((t.length() == 3) && (c>0)) {      // If the temerature is between 100 and 999
62:        String t1 = t.substring(0, 1);       // ...we need the first
63:        String t2 = t.substring(1, 2);       // and second
64:        String t3 = t.substring(2, 3);       // and third digit
65:        matrix.writeDigitNum(0, t1.toInt()); // which we plot to the first, second and third place of 7-seg
66:        matrix.writeDigitNum(1, t2.toInt());
67:        matrix.writeDigitNum(3, t3.toInt());
68:      } ;
69:
70:      if ((t.length() == 3) && (c<0)) {      // If the temerature is between -99 and -999
71:        String t1 = t.substring(0, 1);       // ...we need the first
72:        String t2 = t.substring(1, 2);       // and second
73:        String t3 = t.substring(2, 3);       // and third digit
74:        matrix.writeDigitNum(1, t1.toInt()); // which we plot to the second, third and fourth place of 7-seg
75:        matrix.writeDigitNum(3, t2.toInt());
76:        matrix.writeDigitNum(4, t3.toInt());
77:        matrix.writeDigitRaw(0,64);         // and we plot the minus sign to first place.
78:      } ;
79:
80:      if (t.length() == 2) {                 // If the temerature is between 10 and 99 degrees or -10 and -99...
81:        String t1 = t.substring(0, 1);       // ...we need the first
82:        String t2 = t.substring(1, 2);       // and second digit
83:        matrix.writeDigitRaw(0,0);
84:        matrix.writeDigitNum(1, t1.toInt()); // which we plot to second and third place of 7-seg
85:        matrix.writeDigitNum(3, t2.toInt());
86:        if (c<0) {matrix.writeDigitRaw(0,64);}  // and if the temperature is negative, we plot the minus sign to first place.
87:      } ;
88:
89:      if (t.length() == 1)  {            // Other case is temperature between 0 and 9 or -1 to -9
90:        String t1 = t.substring(0, 1);   // Then we need only the first digit
91:        matrix.writeDigitRaw(0,0);
92:        matrix.writeDigitRaw(1,0);
93:        matrix.writeDigitNum(3, t1.toInt());    // And we plot it to third place of 7-seg
94:        if (c<0) {matrix.writeDigitRaw(1,64);}  // and if the temerature is negative, we plot the minus sign to second place.
95:      };
96:
97:      matrix.writeDigitRaw(2, 0x10);  // light up dot as degree sign
98:      matrix.writeDigitRaw(4,57);     // and the letter C to fourth place
99:      matrix.writeDisplay();
100:      delay(500);
101:    }
102:
103:  }