Pressure/vacuum gauge
Although there are very cheap atmospheric pressure sensors available, for laboratory purposes we need something different. We decided to use MPX4115 chip, measuring absolute pressure from 15 to 115 kPa with 1.5 % precision. Datasheet for this sensor can be found here. It is analog sensor so the output quantity is voltage proportional to the pressure.
As a output device we use this 1.2" LED display from Adafruit which is easily legible from any point of usual classroom. Instruction for preparing the display are available at Adafruit webpage. For usage with Arduino Duemilanove we recommend to solder together the (+) and IO pins of display. In this case only four leads are necessary to connect the display to Arduino.
As we are not skilled electronic engineers, we like to build the device on breadboard first and we highly recommend it, unless you have some background in electronics.
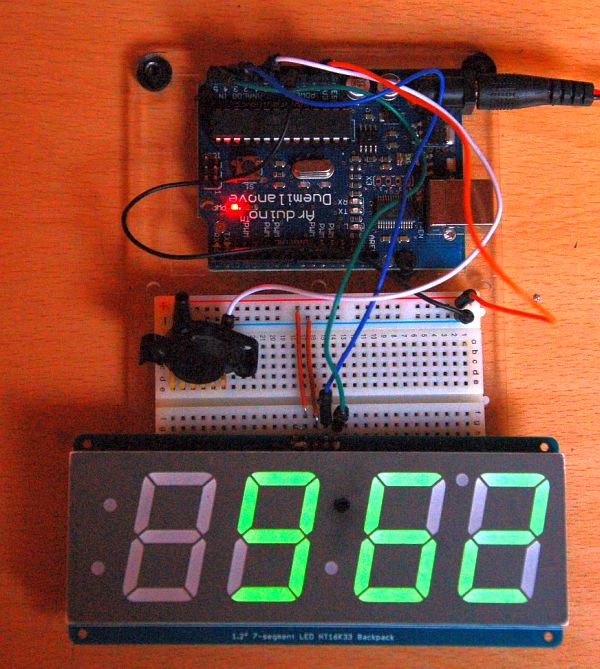
While looking on the MPX4115AP chip in similar fashion like on the picture (eg. having the pressure port on the left side), three left pins are not connected, fourth is connected to +5V, fifth to GND and sixth is output voltage, which is connected to Analog-0 input of the Arduino card (please make sure that you know where to find these connections on Arduino board - see How to? section).
Connection of display is simple too: pins (+) and (-) are connected to +5V and GND respectively, D is connected to Analog-4 and C to Analog-5 (on more recent Arduino cards like R3 and later the pin D is connected to specialized SDA port and C to SCL). For more information please see the Adafruit webpage for this display.
After double-checking your connections you can upload this source code to the Arduino card. Source code uses Adafruit libraries, which are part of the Arduino IDe that you can download from this page.
1:  #include "Adafruit_LEDBackpack.h"
2:  #include "Adafruit_GFX.h"
3:  #include <Wire.h>
4:  Adafruit_7segment matrix = Adafruit_7segment();
5:  void setup() {
6:    // Start up the library for 7-seg and set max brightness
7:    matrix.begin(0x70);
8:    matrix.setBrightness(15);
9:    // wait for MAX chip to stabilize
10:    delay(500);
11:  }
12:  void loop() {           // Do 10 measurments to acquire better results
13:    int sum = 0;
14:    for (int i=0; i <= 9; i++){
15:      sum+=analogRead(0);
16:      delay(10);
17:    }
18:    int P=(sum/10/1024.0 + 0.095 )/0.0009; // Calculate pressure with equation from datasheet
19:    String t = String(P);
20:    Serial.println(P);
21:    if (t.length() == 4) {                 // If the pressure is between 100 and 999
22:      String t1 = t.substring(0, 1);       // ...we need the first
23:      String t2 = t.substring(1, 2);       // and second
24:      String t3 = t.substring(2, 3);       // and third
25:      String t4 = t.substring(3, 4);       // and fourth digit
26:      matrix.writeDigitNum(0, t1.toInt()); // which we plot to the first, second, third and fourth place of 7-seg
27:      matrix.writeDigitNum(1, t2.toInt());
28:      matrix.writeDigitNum(3, t3.toInt());
29:      matrix.writeDigitNum(4, t4.toInt());
30:    }
31:    if (t.length() == 3) {                  // If the pressure is between 100 and 999
32:      String t1 = t.substring(0, 1);        // ...we need the first
33:      String t2 = t.substring(1, 2);        // and second
34:      String t3 = t.substring(2, 3);        // and third digit
35:      matrix.writeDigitRaw(0,0);            // (blank space on first digit)
36:      matrix.writeDigitNum(1, t1.toInt());  // which we plot to the first, second and third place of 7-seg
37:      matrix.writeDigitNum(3, t2.toInt());
38:      matrix.writeDigitNum(4, t3.toInt());
39:    } ;
40:    if (t.length() == 2) {                  // If the pressure is between 10 and 99 torr...
41:      String t1 = t.substring(0, 1);        // ...we need the first
42:      String t2 = t.substring(1, 2);        // and second digit
43:      matrix.writeDigitRaw(0,0);
44:      matrix.writeDigitRaw(1,0);
45:      matrix.writeDigitNum(3, t1.toInt());  // which we plot to second and third place of 7-seg
46:      matrix.writeDigitNum(4, t2.toInt());
47:    } ;
48:    if (t.length() == 1) {                  // Other case is pressure between 0 and 9
49:      String t1 = t.substring(0, 1);        // Then we need only the first digit
50:      matrix.writeDigitRaw(0,0);
51:      matrix.writeDigitRaw(1,0);
52:      matrix.writeDigitRaw(3,0);
53:      matrix.writeDigitNum(4, t1.toInt());   // And we plot it to third place of 7-seg
54:    };
55:    matrix.writeDisplay();
56:    delay(400);
57:  }
In the setup part, the adress of the LED display and maximum brightness is set. Then in the loop ten measurements of the voltage on the Analog-0 input are made and the pressure is calculated. The longest part of the code provides correct way to write the value of the pressure on the display, according to actual value.
We decided to display the pressure in hectopascals (millibars), because in this case the four-digit display will give the best precision (the maximum value will be displayed as 1150 hPa). We would lost one significant place with kPa - maximum value then would be 115 kPa). If you really want to use this pressure gauge in kPa, make the decimal point between third and fourth digit with permanent marker :-)