Cheap -55 to 125°C thermometer
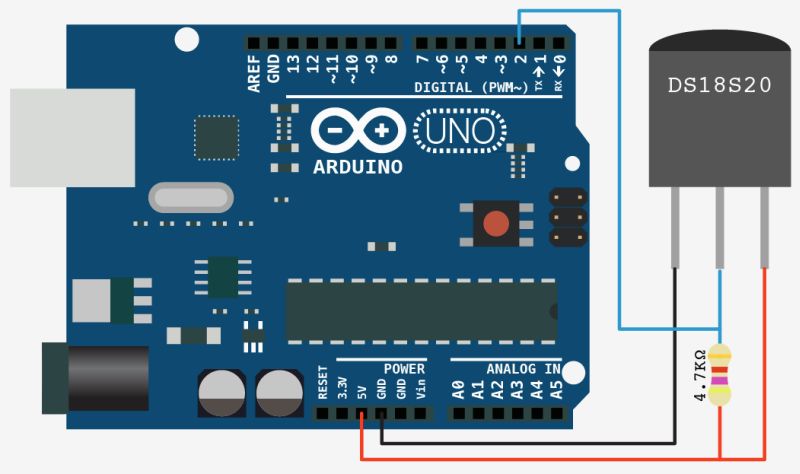
If the -55 to 125°C interval satifies your needs, thermometer can be built very cheaply. Digital sensor DS18B20 (datasheet here) can be bought here or here and it can be connected to Arduino board very easily. We recomend waterproof version, which can be connected to breadboard with pins:
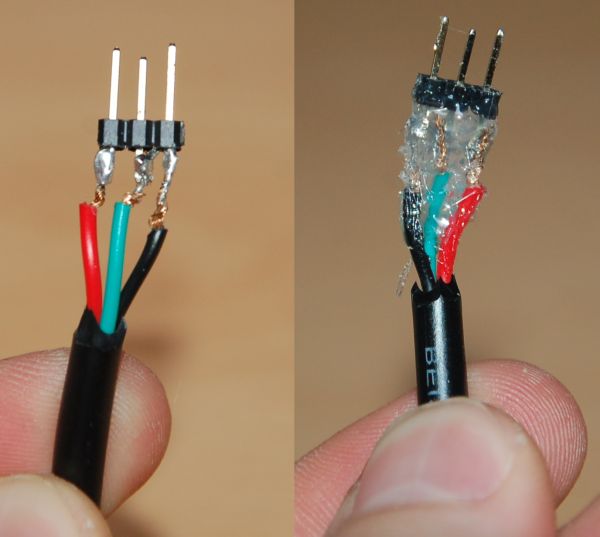
It may not be the prettiest way, but it works. The sensor has three leeds: Red ic connected to +5V, black to GND and green is data out, which is connected to digital pin 2 of Arduino board AND via 4k7 resistor to +5V:
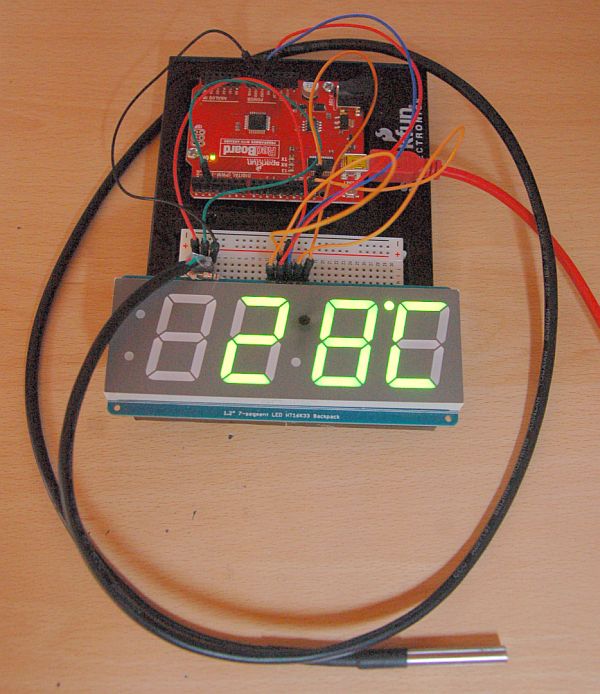
Whole thing is then secured with hot melt adhesive. As a output device we use this 1.2" LED display from Adafruit which is easily legible from any point of usual classroom. Instruction for preparing the display are available at Adafruit webpage. For usage with Arduino Duemilanove we recommend to solder together the (+) and IO pins of display. In this case only four leads are necessary to connect the display to Arduino.
As we are not skilled electronic engineers, we like to build the device on breadboard first and we highly recommend it, unless you have some background in electronics.
Connection of display is simple: pins (+) and (-) are connected to +5V and GND respectively, D is connected to Analog-4 and C to Analog-5 (on more recent Arduino cards like R3 and later the pin D is connected to specialized SDA port and C to SCL). For more information please see the Adafruit webpage for this display.
After double-checking your connections you can upload this source code to the Arduino card. Source code uses Adafruit libraries, which are part of the Arduino IDe that you can download from this page.
1: #include <OneWire.h>
2: #include <DallasTemperature.h>
3: #include "Adafruit_LEDBackpack.h"
4: #include "Adafruit_GFX.h"
5: #include <Wire.h>
6: Adafruit_7segment matrix = Adafruit_7segment();
7:
8: // Data wire is plugged into pin 2 on the Arduino
9: #define ONE_WIRE_BUS 2
10:
11: // Setup a oneWire instance to communicate with any OneWire devices
12: // (not just Maxim/Dallas temperature ICs)
13: OneWire oneWire(ONE_WIRE_BUS);
14:
15: // Pass our oneWire reference to Dallas Temperature.
16: DallasTemperature sensors(&oneWire);
17:
18: void setup(void)
19: {
20: // start serial port - for debugging
21: Serial.begin(9600);
22: Serial.println("Temperature");
23:
24: // Start up the library for 7-seg and set max brightness
25: matrix.begin(0x70);
26: matrix.setBrightness(15);
27:
28: // Start up the library for temperature sensor
29: sensors.begin();
30: }
31:
32:
33: void loop(void)
34: {
35: // call sensors.requestTemperatures() to issue a global temperature
36: // request to all devices on the bus
37:
38: sensors.requestTemperatures(); // Send the command to get temperatures
39:
40: // You can have more than one IC on the same bus.
41: // 0 refers to the first IC on the wire
42: int temp = round(sensors.getTempCByIndex(0));
43:
44: // We need to convert the absolute value of temperature to string
45: String t = String(abs(temp));
46: if (t.length() > 1) { // If the temerature is between 10 and 99 degrees or -10 and -99...
47: String t1 = t.substring(0, 1); // ...we need the first
48: String t2 = t.substring(1, 2); // and second digit
49: matrix.writeDigitRaw(0,0);
50: matrix.writeDigitNum(1, t1.toInt()); // which we plot to second and third place of 7-seg
51: matrix.writeDigitNum(3, t2.toInt());
52: if (temp<0) {matrix.writeDigitRaw(0,64);} // and if the temperature is negative, we plot the minus sign to first place.
53: } else { // Other case is temperature between 0 and 9 or -1 to -9
54: String t1 = t.substring(0, 1); // Then we need only the first digit
55: matrix.writeDigitRaw(0,0);
56: matrix.writeDigitRaw(1,0);
57: matrix.writeDigitNum(3, t1.toInt()); // And we plot it to third place of 7-seg
58: if (temp<0) {matrix.writeDigitRaw(1,64);} // and if the temerature is negative, we plot the minus sign to second place.
59: }
60:
61: matrix.writeDigitRaw(2, 0x10); // light up dot as degree sign
62: matrix.writeDigitRaw(4,57); // and the letter C to fourth place
63: matrix.writeDisplay();
64: delay(500);
65:
66: }