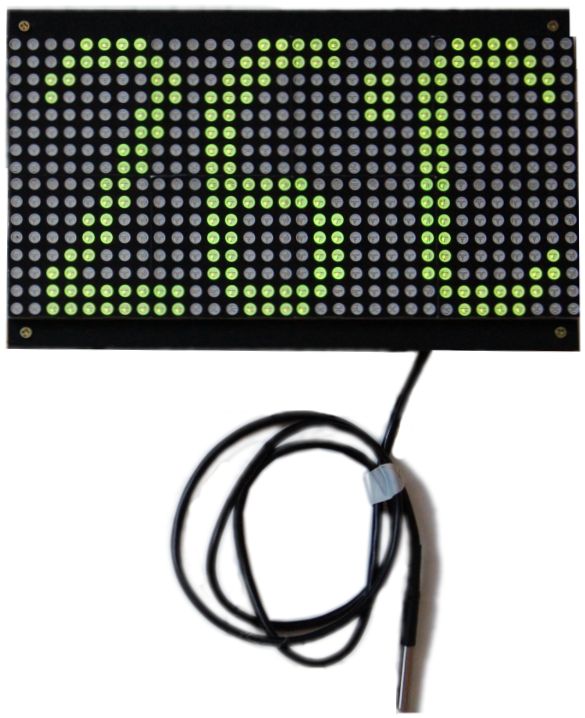
Demonstration thermometer with 5" display
This project uses SURE 3216 Bicolor Matrix Display. This display is even simpler to use than 7-segment LED display because there is very good library for Arduino (which is of course part of the download archive).
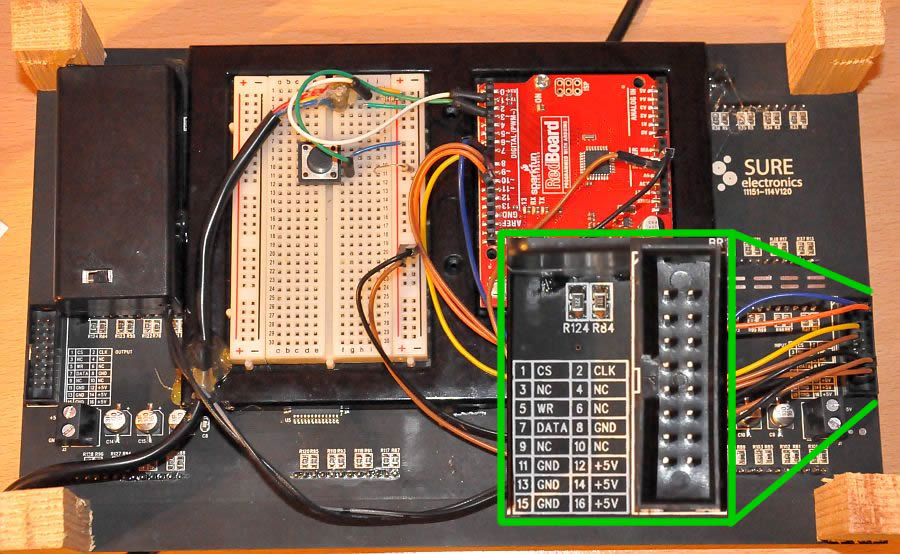
The connection is very simple. SURE display has input headers on the right side, marked INPUT (OUTPUT on the oder side is used to cascade more than one dislay in row). GND and +5 V have to be connected to GND and 5 V pins on the arduino card. Pins CS, WR, DATA and CLK are connected to pins 8, 9, 10 and 11 on Arduino (this can be changed in the source code). Digital sensor DS18B20 (datasheet here) can be bought here or here and it can be connected to Arduino board very easily. We recomend waterproof version, which can be connected to breadboard with pins in similar way as in our simple thermometer
Source code is based on the DS18B20 example:
1 2 3 4 5 6 7 8 9 10 11 12 13 14 15 16 17 18 19 20 21 22 23 24 25 26 27 28 29 30 31 32 33 34 35 36 37 38 39 40 41 42 43 44 45 46 47 48 | // PhysDuino HT1632 thermometer with DS18B20 sensor // Based on http://www.hobbytronics.co.uk/ds18b20-arduino (sensor part) // and https://github.com/gauravmm/HT1632-for-Arduino (display render part) #include <OneWire.h> #include <DallasTemperature.h> #include <font_16x8.h> #include <HT1632.h> #define ONE_WIRE_BUS 2 // Data wire is plugged into pin 2 on the Arduino // Setup a oneWire instance to communicate with any OneWire devices // (not just Maxim/Dallas temperature ICs) OneWire oneWire(ONE_WIRE_BUS); // Pass our oneWire reference to Dallas Temperature. DallasTemperature sensors(&oneWire); String s; // For render - see below char m[5]; void setup(void) { Serial.begin(9600); // Start serial port - for debugging sensors.begin(); // Start up the library HT1632.begin(8, 9, 10, 11); // Start up HT1632 display (CS, WR, DATA, CLK) } void loop(void) { // call sensors.requestTemperatures() to issue a global temperature // request to all devices on the bus sensors.requestTemperatures(); // Send the command to get temperatures int t = sensors.getTempCByIndex(0); // Why "byIndex"? // You can have more than one IC on the same bus. // 0 refers to the first IC on the wire String s= String(t)+"'C"; // Heavy wizardry starts here Serial.println(s); s.toCharArray(m,5); // You can't use string directly as parameter of function, hence the m[5] char array HT1632.drawTarget(BUFFER_BOARD(1)); HT1632.drawText(m, 2, 0, FONT_16X8, FONT_16X8_WIDTH, FONT_16X8_HEIGHT, FONT_16X8_STEP_GLYPH); HT1632.render(); // Board 1's contents is updated. delay(250); // Measuring four times per second } |